Project Hemorrhage Design Journals
- Jordan Alper

- Apr 18
- 20 min read
Updated: Apr 20
January 13, 2026
This week was just brainstorming and testing different movement systems. Our team met for a couple of hours last Saturday to discuss what sort of game we want to do. I really love souls-like games so I really wanted to incorporate something related into our game. Otherwise, I just love big swords doing lots of damage, so anything beyond that was ok. I love most types of action games so I'm okay with doing most things. We settled on a combat based game with souls-like dodging. The combat system was heavily inspired by Darksiders, as one of our teammates is a big fan. I really enjoyed the dodge system from games like Bloodborne, but took it a step further and discussed implementing some sort of dodge system like the Jedi games from Star Wars. (this clip just shows a fight where the dodge is used https://www.youtube.com/watch?v=rXQOaFNbKZU). In those games, when you press the dodge button you do some sort of quick sidestep, like in Bloodborne, but pressing it again while doing that motion results in a full roll, giving the player a lot of control over their dodges. To incorporate the power fantasy that we wanted, we decided on having a primary attack, secondary attack and 2 skills. These can be used in combos, along with the dodges, to perform combos for more damage or something else. We also settled on a parry mechanic where if the player dashes towards the enemy they will perform a "deflecting dodge", as we've dubbed it for now. This, if timed right, will allow for a parry. We also decided on a player sharpness bar which will act as the player's "energy" resource, and can be built up and used for the skills or other types of moves. Again, this week was all about the design and brainstorm so all of these ideas, while decided upon, could change.
We decided on the actions shown in the image below.

I hopped into Unreal for a bit to test some movement. I booted a project using the third-person template just to get started, then tried to implement dodges. At first, I got a dash working without any extra animations, but I really wanted to see how it felt with an actual animation in place. With some help from my teammates, who found and put some animations into the engine for me, I was able to hook up the dodge (sidestep) animation to the dodge button. I played around with it a little more before attempting to add the full roll after the sidestep if the button is pressed again. This took some time, but I got it working well enough for my testing purposes. I then got started on a lock-on system. I eventually got this working as well. It works as such:
The camera has a cone attached to it to check for any overlaps of the the enemy class, which it does when the lock on button is pressed.
If any targets are found within the cone, a function determines the closest one.
The camera is then pointed at the center of mass of the enemy found, and is constantly updated to stay that way.
If the button is pressed again, the camera is released and the player can continue with free camera movement.
After discussing with my teammates, we merged two characters that we had created together, one having the lock-on system and one having multi-directional dodge inputs that functioned with the lock-on system.
My next goal is to add the ability to switch lock-on targets. We also need to work on polishing the animations and roll timing so that it not only looks cleaner, but feels better.
January 20th, 2026
This week, we had a discussion after class last week about the vibe of our project, what metaphor we want to convey with our combat system. We settled on a gothic vampire setting, so we'll do things along the lines of gothic churches and blood related abilities. We also discussed task lists and who should complete what for the next weeks deliverable. We spent a lot of time discussing vibe and exactly how things were going to function. Our teammate also imported a new animation pack to Unreal Engine, and another teammate cut down what we didn't need and migrated everything over from the old player character that we had, which was really helpful. It made it much easier to jump in and start making mechanics.
What I did individually this week was implement directional lock-on and make a object grab and throw. For the directional lock-on I project the current enemy to the screen, check if other enemies in lock-on range are to the left and right, compare that with the directional input put in by the player, and if everything matches up I switch it in the correct direction to the proper enemy. For the grab and throw I just use a state on the character to determine if they are holding something. If not, I use the same enemy detect function to determine objects that can be picked up, and grab the closest one and set it to a location next to the player (for now). Then, when you press the button again, it throws the object you are holding. That is what the state variable is for, to determine if the player should pick up or throw. Our plans for this are still unsure, but it could be good to throw corpses at enemies, or even grab enemies and pull them in to attack them. Its a good base for any of that. Before this week, we did not have object interaction and the player could not switch lock on targets.
For the future, I want to work on 2 things, moving the base attack of the player to a GAS ability to practice using GAS, and maybe make it light an enemy on fire. I also want to work on making the objects get thrown at the location of the enemy you're currently locked-on to, if you are locked on. Otherwise it just launches the object which is fine.
Here is a video of the throwing and the lock-on switching.
January 27th, 2026
This week, my team and I met and discussed specifics about our game, going further into detail about things like VFX, enemy number, skills, etc. We discussed what qualities we would want and from what games we would pull them from. We discussed implementing perfect dodges vs a parry system, and landed on perfect dodges because we think it will feel better in the flow of the game we're trying to build, which has quick combat.

Individually, I implemented a homing missile that tracks to the enemies location. We may use it for environmental interactions, or throwing body parts around, as we are going to have some sort of dismemberment. I just set the location of the missile to the location of the enemy over a timeline, using Booleans to destroy it on it. If you're not locked on, the object just launches with an applied impulse.

This video shows the box pickup and throw in action. It shows the lock-on mechanic, and how it homes to the player.
February 3rd, 2026
I fully reworked the lock-on system this week. After discussion with the team, we decided to go ahead and prototype a new lock-on system. This system uses a tracing instead of the cone we had before. It determines all viable targets in a sphere, line traces to them, then sets the camera rotation to point to them (in essence). It also allows for directional switching based on where the player is on the screen compared to the enemy. This lock-on system seems much better than our previous one, although it has not been bug-tested yet. It also allows for line-of-sight, so it should not lock on to enemies behind walls. The new lock-on system is also now in an actor component, which allows for it to be configured even if someone needs to use the player character blueprint, which will be extremely useful.
This code shows how the system gets the target to the left of the original one, if it exists, determines which is closest, and switches the lock-on target.

The code below shows how the lock-on system does a sphere trace to gather all the targets in a radius, then checks whether they are the correct class and adds them into the actor array of targets.

The code below shows how the system determines what the closest target is to the player, out of the viable lock on targets.

The code below shows how the system checks to see how close the target is to the center of the screen.
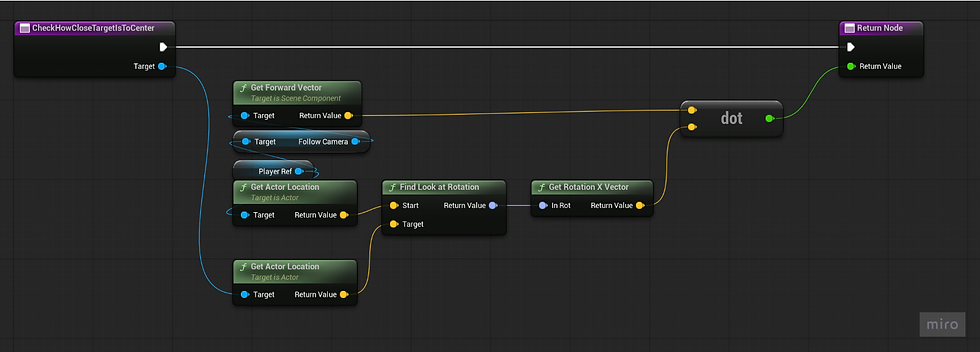
The code below shows how the system adjusts the camera to point at the target. The Set Control Rotation node is outside of the function.

Overall, this lock-on refactor should prove to be much better than the initial iteration, as it can do much more and is more easily configurable.
Note: The channel "ObjectQuery7" is actually "LockOnPawn", an object channel I created for the traces. The naming was not showing up correctly.
February 10th, 2026
This week our team discussed controller layout, as well as a deeper dive into skills and abilities.

We discussed tasks for the next week, which for me included fixing the throwable objects and adding a finisher of some sort on an enemies death. We did not get around to having enemies actually die after taking damage, so instead I worked with Shaylin to get the Health attribute in GAS hooked up to a widget.
For now, it only works for the player, but when T is pressed on the keyboard (debug for now), the player takes 1 damage.

This is setup up with a Gameplay Effect that is used in a Gameplay Ability, which is called in the player character.

This also calls a function called update health in the player character, which implements an interface that calls a function in the HUD.

HUD Blueprint:

That then pushes all of the attributes through to the actual health widget, updating its value based on the Health attribute in GAS.

Now that that is working, next week we can make enemies die, so I can work on the finisher.
The other thing I did was fix the throwable objects. It was completely broken after updating the lock-on system, so it needed a rework as well. It is now an actor component and uses projectile movement to make a homing missile that tracks the target. The GIF below shows the objects as well as the health bar.

Lastly, I added some temporary SFX onto the sword swings and fixed lock-on so that it actually does account for line of sight!
February 17th, 2026
This week my team and I discussed skills deeper. We are on a good track right now, so we did not have much to discuss other than playtesting, like what questions would be on the form and such.
I was pretty busy this week. Last week, we make a quick decision to make the boxes into blood balls. This change caused issues with the way I had setup throwing the blood ball without being locked-on, so I had to redo that aspect of it as well. We decided that the blood balls could be consumed for health as well, so I went and integrated them in GAS, giving their heal amount a unique attribute.
I also changed how the player hurt was functioning, making it so that the actor that calls the PlayerHurt GAS ability can dynamically set how much damage they do. That may change in the future.

For consuming for health, I made it so that if they are on the ground and the player taps interact, it picks it up and if they hold interact it consumes it straight from the ground. If they are holding it and they tap interact, it throws the ball, but if they hold it they consume it for health. I also added SFX and VFX to this, and created an AnimNotify to handle the healing.

For my other work this week, I got one of the two finishers functioning. If you close to an enemy and press F (as that's the debug key it is on right now), you perform a finisher. This uses contextual animations and motion warping, which are plugins that have been added to the project. I added some camera shake as well as SFX to it, but it lacks VFX right now, as well as an in-game implementation.
Here is a video of the back finisher
February 24th, 2026
This week, my team discussed tasks for the week and then began talking about enemy behavior. We decided on using a ranged enemy to test the players movement, then using a melee enemy to allow them to express themselves however.
Individually, I worked on a couple things this week.

First, I worked on getting the finisher system completed. Now it uses both our front and back animations for executions that we got with our animation pack. It also determines whether you're in front or at the back of the enemy, and plays the correct finisher for whatever side you're on. Contextual Animations allow for some very cool things, like the ability to check for direction of where you are executing, all within the contextual animation itself.

I also worked on I-frames this week for the player. Whenever they do a sidestep, they get 10 frames of invincibility, and whenever they do a full roll they get 15 frames. This is done through a GAS tag. Basically, when rolling, there is a custom animation notify state that gives the tag to the player at the beginning and removes it at the end, using two different custom Gameplay Effects. The effect that applies the tag just adds the tag to the owner, and the effect that removes it checks if the previous effect exists on the owner, then removes that effect, effectively removing the tag. In the enemy blueprint, when the enemy hits the player, if that actor (the player) has the invincible tag the damage is not applied.

This screenshot shows the Animation State that is on the animation of dodges, to allow for the player to have the State.Invincible tag applied.
Below is a video of the finishers
March 3rd, 2026
This week, our team met and discussed the playtest feedback from our recent playtest. We already had UI elements that met the requirements, so we discussed looking at the playtest feedback and fixing what was noted. For me, that meant looking at the blood balls, as there were some concerns with them. We also talked about how we want our UI to look, what color the Health and Blood Bar should be. We are still in discussion about this.
This week I took a look at fixing the blood ball and working on the finishers some more. I also did a little research into enemy AI in Unreal Engine, so I could help work on enemies or potentially a final boss. I watched this video to get me up to speed on Blackboards in Unreal:
https://www.youtube.com/watch?v=QJuaB2V79mU
I then fixed the blood ball. I changed two things about it, the collisions and how it throws. I turned collisions off initially, and then turn them on only when the blood ball is thrown. The major change that I made was ensuring the blood balls always had magnetism. Now, if the player is within range of a targetable enemy, if they throw the blood ball it will find the nearest enemy and go towards it, whether they're lock on or not. If the are outside of targetable range, it will throw in the direction of the camera, but now it has a clamped z-value minimum, so the player cannot throw it into the floor. This was an issue players were having, as the camera was typically pointed towards the floor. Here is the new code for if the player is not locked on:

Next, I worked on the finisher. Since we are using it for only finishing moves, and the player is completely invincible during it, I figured it could be cool to swing the camera around to allow the player to always see the finisher. It still needs some work, but its in a good spot at the moment. I also added collision disabling during the finisher so the arrows do not hit the player.
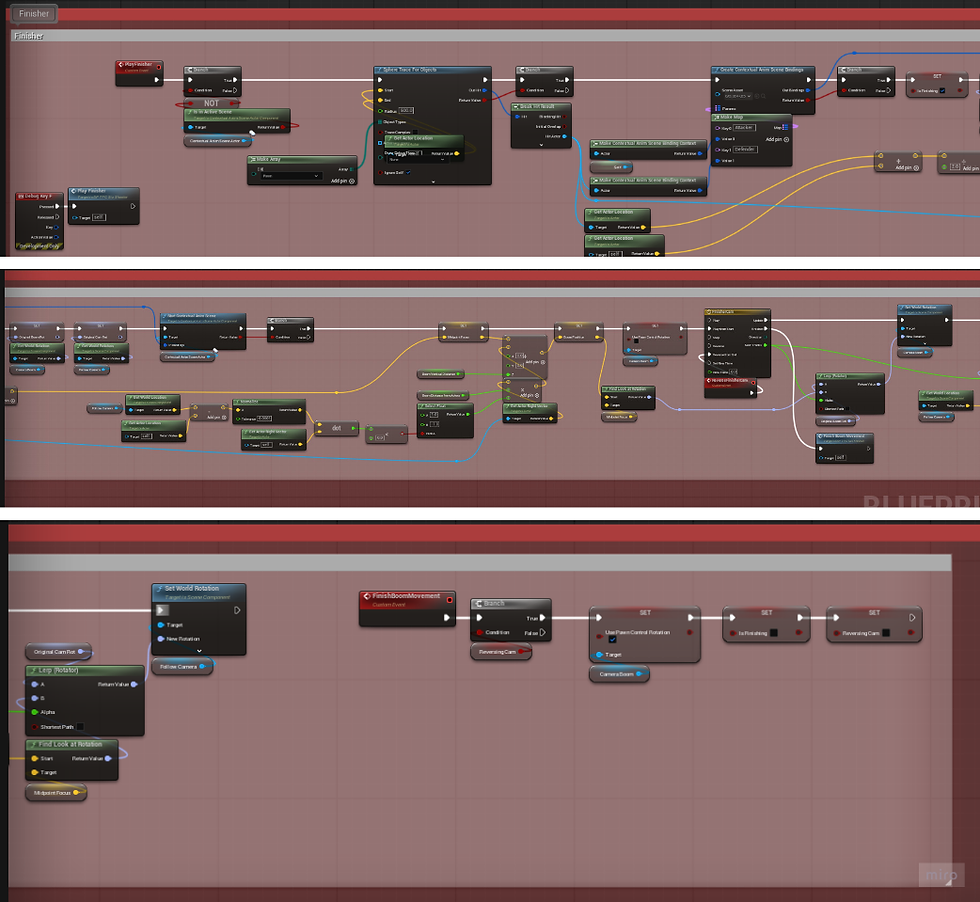
The function is quite long so it had to be split into multiple images.
Here is a video of the finisher camera
March 17th, 2026
dedicated some time to research this week. Our team discussed making a boss fight, so I began to learn how to use the AI trees in Unreal. I first watched a basic video on how to even use the behavior trees:
This video was extremely helpful in learning the basics of the AI behavior trees and how to setup a basic enemy. I figured it may be difficult to create a boss without knowing the basics of the blackboard and AI controllers first. It seems relatively simple to do what they did in the video, which is get an enemy to follow the player, but I can see how it can all become complicated quickly.
I then went on to watch a more in-depth video about how to create a boss in Unreal Engine:
This video went more in depth on the specific boss they were trying to setup, which was a large metal/rock creature that slams down on the player when in range. It is a useful reference but not exactly what we're thinking.
We have not decided what our boss will be yet, or if we're even going to create one (only if time allows). We would like to do one but at the moment do not have the required models or animations for one. We are potentially looking into scaling up a player character and trying to reuse animations, but have not fully researched that option yet.
From both videos I learned about how to setup a patrolling AI enemy, which was definitely the most useful thing. I think after the initial setup I'll be able to just play around with it and figure out what to do, especially with my team.
Finally, I have given some thought to the camera that I created for the finisher, and am starting to dislike it. I have not decided yet if I will remove it, I want my team's opinion first, but it just feels weird locking the player to a specific camera. After watching a video of a finisher from Dark Souls 3, the camera is completely unlocked during a finisher, which seems to just feel better. While it is a cinematic moment, the camera lock and shift feels like it breaks immersion.
March 24th 2026
This week on worked mainly on two different polishes for my previous work. I worked on blending the ball animation so that when the player eats a blood ball to heal, the actually walk, and so that they move a little slower. I also worked on the finisher a bit, trying to make it kill an enemy, so it actually felt like it was doing something.
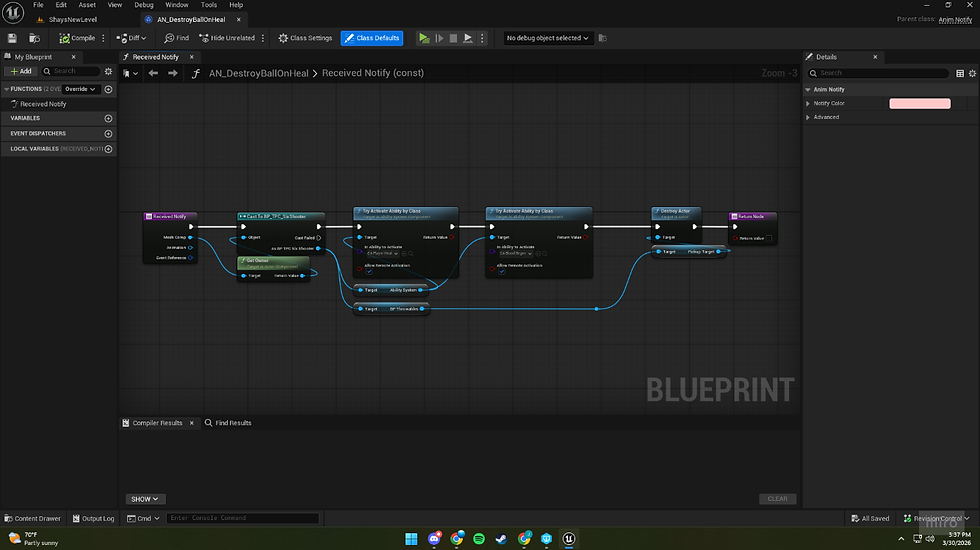
First, I started with what I knew how to do, the finisher. I added an animation notify to apply a lot of damage at a point in the animation, so that it killed the enemy.

I had to create a notify to apply the damage, then touch up the enemies blueprint to ensure that the lock-on was ended even if the enemy was killed in a finisher. This worked very well.
My second task was more difficult, as I do not know animations all that well. I tried many different things, but ended up on changing around our animation blueprint to look like this:

Basically, I am now storing our default animation state into a cached pose, then blending that pose with itself UNLESS an animation montage of the slot "UpperBody" is being played, then that plays just above the spine bone. It then outputs that as the stance. The "DefaultNode" seen in the original stance is there to play the finisher animation montages, but it isn't being blended because those animations require the lower half of the body to move as well for it to look normal.
I then worked on slowing the character down while the player healed (eats a blood ball). Now that the animation was working properly I wanted to touch this up as well. I first added a notify to the animation montage.

I then made an animation notify that sets the characters max walk speed to be divided by 1.15 (that's the number I found that feels decent at the moment).

Initially, I tried to just set the max walk speed, but realized quickly it was being overridden in a macro function on Event Tick in our character. That is where the solution of just dividing it at that point in the function by 1 at all times, and then just increasing that number when eating a blood ball and resetting it afterwards. This solution worked very well.

Here is a video of the finisher killing an enemy and the blended healing animation with slowed movement: Video
March 31st, 2026
As a group, we discussed ways to generate blood, which is our "energy" element. One way we decided on was making the blood balls not only heal the player but regenerate blood on consumption. Due to this, I went and added this to the blood ball animation notify.
Another major bug I discovered was that after changing around the finisher to make it execute an enemy, if you exited the Play In Editor window during the finisher, Unreal Engine crashed. While this technically wouldn't happen in-game, I don't like leaving any sort of crash unattended. After a while of digging through the finisher, adding false return nodes everywhere I could, it didn't seem like it was solving anything. I then went to the Animation Notify State, and discovered this was where the problem was, if this closed during play it broke. I made a Boolean that gets set to true on EndPlay in the Player Character, and then added a notify tick to check that Boolean. If it got set to true, the Animation Notify State exited with false, which fixed the crashing.

The final and most ambitious aspect I worked on this week was the surprise and delight factor. Cool cutscenes before big fights always wow me when I'm playing a game, so I went in, learned how to use level sequencers (I had never touched one before) and tried my hand at making a cutscene. The most difficult thing to figure out was how to make it blend to and from the character, but it turns out UE5 has a very nice way to set the character in the level sequence to be replaceable with the player pawn. Otherwise, I have a cinematic camera, a placeholder VFX, a placeholder boss, a pillar that falls, and a cube that I use to track the center of the arena as tracks in the sequencer. I then took each track and added keyframes and constructed the cutscene bit by bit. It was actually way more enjoyable then I expected it to be, which was nice. I also recorded a couple of voice lines and added some effects to them to make them sound more "boss-like" at least in my opinion. I got some other SFX as well to add in when it felt necessary. Otherwise, I'd say its pretty cool but definitely not complete. I need to ask people who've done cinematic work before to look at it and give me their thoughts.

Here is a video of the cutscene
April 7th, 2026
This week, I looked into polishing the boss intro cutscene. I added a custom VFX made for the Bifrost-like effect, as well as made it modular. To make it modular I set it transform origin to a cube in the level. By doing this, I've allowed anyone to move that specific block and the cutscene will move with it. Now, if we want the final arena to be adjusted, our level designer can move the arena and just select the transform origin with it to move the cutscene with it. I made each component of the cutscene a spawnable, as well as made it keep it state so that after the cutscene ends it remains as it is.

I also did some work fixing the animations of the blood ball. The way it was implemented into the animation graph was not setup well, making it break often. I fixed the blood ball throwing while not locked on.

I changed the slow mechanic on consuming a blood to be an animation state instead of a animation notify.

I also worked with Wyatt to make the blood idol skill allow the enemies to be finished at a higher health percentage threshold.

I am beginning to work on a cutscene to introduce the player to the blood wave ability.
I also worked with Shaylin to add a chaos to the pillar that falls in the cutscene. She made chaos geometry for the pillar and I worked on simulating it in the sequencer itself. It was tricky, but it turned out pretty well. We had to record a cached simulation and play that in the sequencer.
Here's a video of the new cutscene
April 14th, 2026
This week I worked on the cutscene that is meant to teach the player the blood wave ability. I started off with just what I wanted it to look like, without any audio or enemies. It was just player movement and camera cuts. I then added 6 soldier enemies that are spawnable, then adjusted their transform to run towards the player and added animations to correspond with that movement. I then gave each enemy a different attack animation and had them attack toward the player. I then dilate time to slow down their attack, pause the sequence, and start a quick time event.

The quick time event blueprint can be seen below. Basically, I create a new Input Mapping Context that just contains the ability that we are teaching the player, the Blood Wave. I then pause the sequence and create a widget that tells the player to press RB and adds a pulsing red effect over the screen. I then enable input and start a timer. This timer has an if statement that is checking for one thing: a boolean that only becomes true when the player presses the ability button. Once they do, I clear the timer, disable input and remap the Input Map to the normal input mappings. I then play the sequence and give them an ability that refunds the blood used in the cutscene, then activate it once. I then hide a UI element that covers the ability on the screen, and use a timeline to fade the music out.

As for music, I had to play the background music for the cutscene separately so that it didn't pause with the cutscene. I also gave the player a variable that is exposed to cinematics that I synced up with the time dilation. This is for pitching the background music down, as when time slows I want the audio to "slow" too. There was no way I could find to expose the value of the time dilation track itself, so an instance editable variable on the player that is synced to the sequencer time dilation was my best solution. It works quite well and gives the effect I wanted.
This is the Gameplay Ability that refunds the blood from the cutscene blood wave use.

I worked with Shaylin on the tutorial as well. We setup an Enumerator that determines which action has been pressed, and then checks if it is the required action. If so, it opens the corresponding door and increments the required action to be the next action in the tutorial.
By binding each trigger box to an overlap event, it creates the widget depending on the index of the Enumerator, then checks if it is the required action. If so it increments the Required Action and moves onto the next.
I also edited the boss cutscene. I changed the amount of time the camera looks at the pillar, shortening the waiting time. I also added a close up of the boss for added effect.
Here is a video of the new boss cutscene
Here is a video of the new blood wave tutorial cutscene
April 21st, 2026
This week was all about polish. I went through the game multiple times and determined what we had and what was needed. Initially, I worked with Shaylin to fix some bugs with the tutorial. There were some issues with which actions needed to be taught, and the function call to complete said action and move on to the next room.
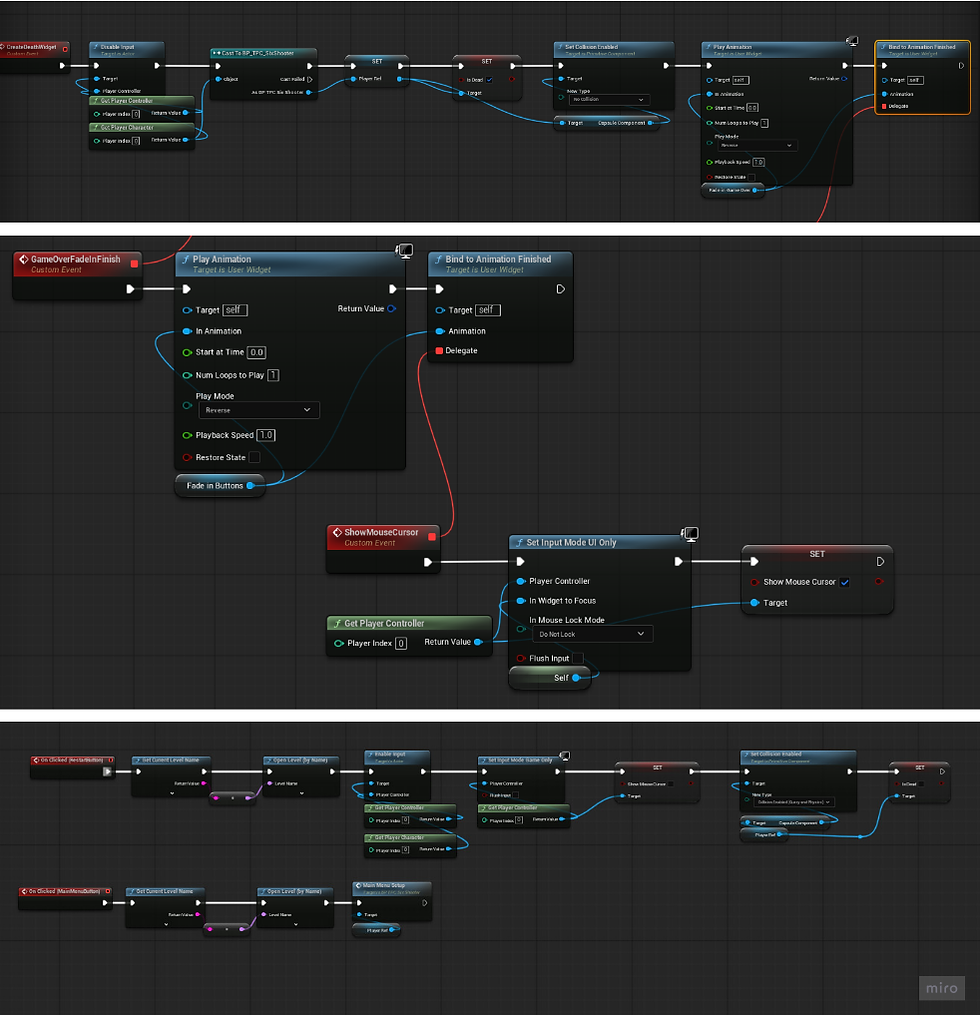
My main work for this week was the Title Screen and Game Over Screen.
My first task for the week was a Main Menu Screen. I decided on doing it a non-traditional way, as I had a cool idea to make the camera blend to the player camera on game start. I set up a camera in our main level scene and possess it on game start, hiding the HUD and adding in the main menu widget and music. On pressing Play, the camera then does a Set View Target With Blend to blend smoothly to the player camera, also flying over the entire level. The music changes, the HUD appears, and the player gains control of their character. These are the blueprint functions that set up the main menu and handle when the player selects Play.

I then worked on a game over screen, as well as a player death state. I set up a state in the animation graph called "isDead," so that when the player dies they transition to an dead animation and lose control of their character. A Game Over screen fades in, then the buttons to restart or return to main menu appear. The character plays a death animation and sound while the game over screen fades in. The code for the functionality of the game over screen is below.
Other than those, I worked on a lot of small polish things throughout the whole game. I changed the ball eating animation so that it didn't continuously repeat until it completed if canceled, and made it dodge-cancelable. I also fixed a bug with the game over screen where it wasn't restarting properly. I changed the blood wave ability so that the player was not indefinitely invincible afterwards, and made sure the player has enough blood energy to use the ability in the cutscene.
I blended different background music to fade in and out depending on where the player is in the level. I also switched out the boss in the final cutscene with the boss we are actually going to use in-game.
Here is a video of the Main Menu and death screen:
I also implemented a checkpoint system to respawn the player. I first started by making a custom game instance, as I needed something that would remember what point the player had gotten to. I used that to store which different checkpoints the player had reached.
I overrode the Player Spawn function in the game mode, and on game start or on respawn I use the game instance to find all checkpoints, set them, check which one the player needs to respawn at, then use that as the player start. There is a checkpoint after the tutorial and after the blood wave
Comments